
Now that we know how to attach scripts, let’s look at how we handle input in our game, using both Haxe and Nodes. There are generally two basic approaches to input in any game engine, event-driven or polled. In an event driven approach to the input, you implement callback functions that are called when input occurs, while in polled input in your game loop you generally poll the status of various input devices and respond accordingly.
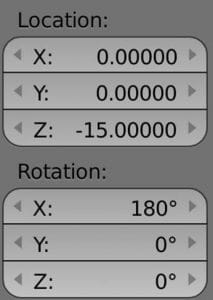
Let’s start by looking at event driven keyboard input using nodes. For the following example I’ve moved the camera to the following coordinates so the X, Y values are left/right, up/down.
I attach the following script to the object (such as the default cube) in our scene.
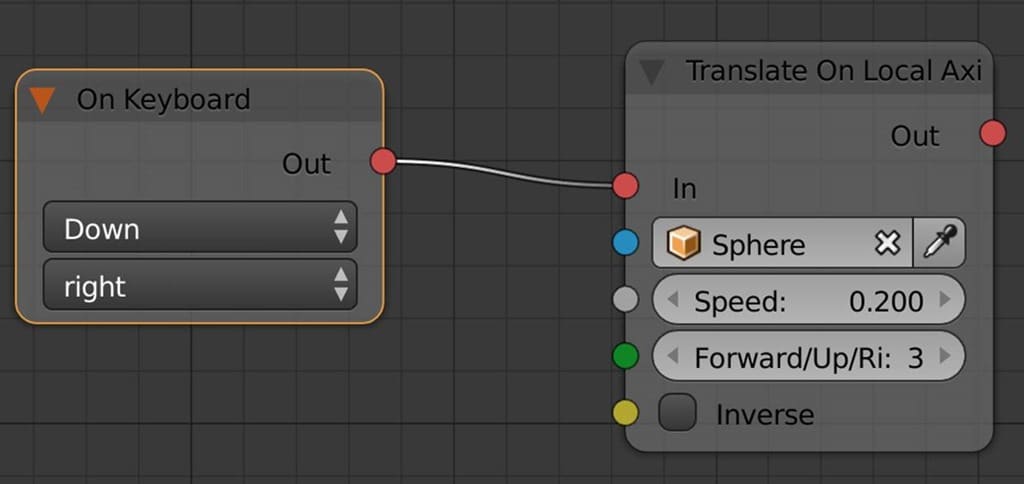
This tree is very straight forward, On Keyboard is an event called when the user hits a key on the keyboard. In this case, when the “right” key is Down, we move the selected object 0.200 along the right local axis. In English, we move a little to the right when the right key is pressed.
Now let’s look at a slightly more complicated example:
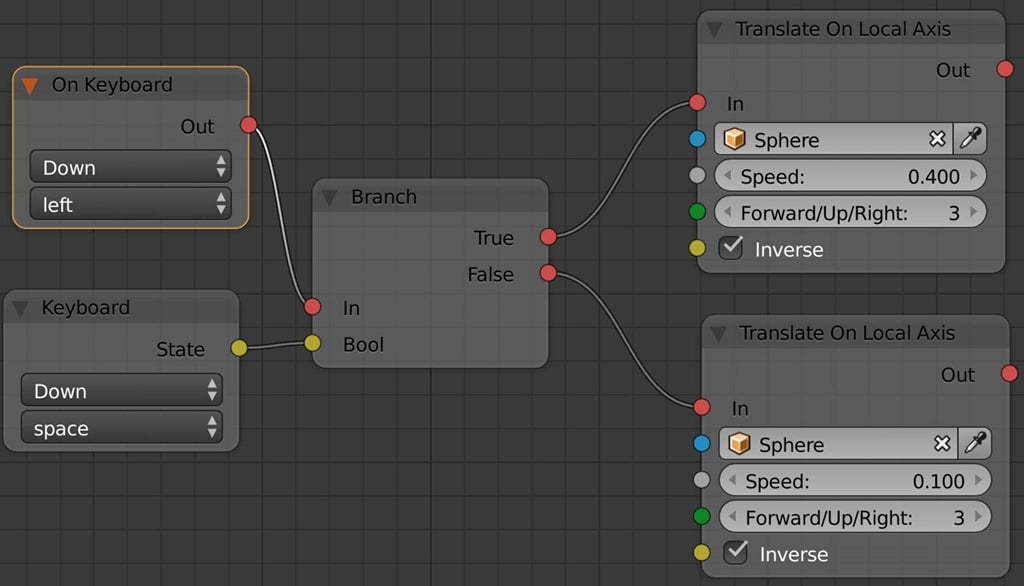
This example is simply doing the exact same logic, just for handling the left key instead. Notice we move left by ticking the Inverse button in the Translate On Locale Axis node. The key difference in this example is we are also showing how to poll the status of the keyboard as well. This event is still only fired On Keyboard when the left key is pressed, but we also poll the Keyboard to check if the space bar is down. If the user is pressing the spacebar, we move 4x faster. This shows how you can easily check for multiple concurrent keypresses.
One important thing to be aware of when dealing with keyboard events is the status you are checking for:
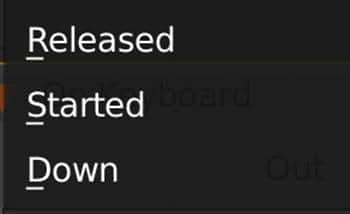
Down is fired whenever a key is down for as long as the key is down. This means the event will be fired over and over as the key is held down. If you want to run your code once per keypress you use either Started or Released. Started is fired when the key is first pressed down, but only once per key press, while Released is called when the key is released, once again only once.
Now let’s take a look at handling the mouse using Nodes. This node graph is a bit trickier.
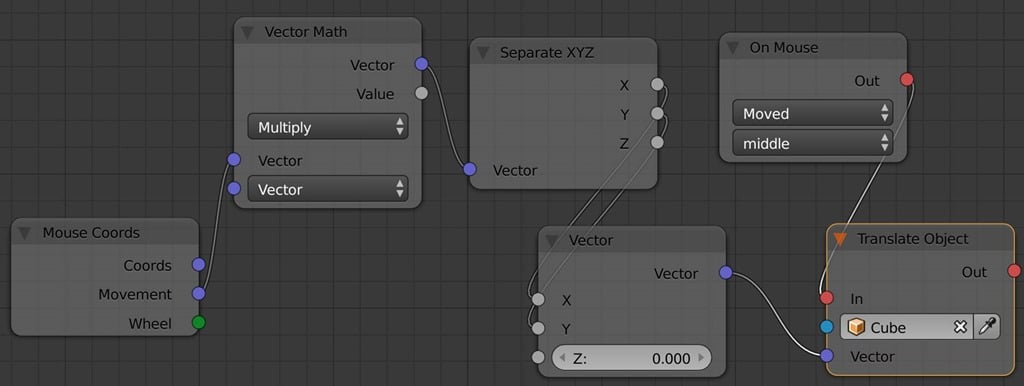
Here the process is fired by the On Mouse and ultimately just moves the bound object using a Translate Object node. We need to do some work to figure out how much to move by. We start by checking the mouse position using a Mouse Coords node and taking the Movement output, this is the amount the mouse moved by since last call. We then multiple it by a vector of 0.01,0.01,0.01 to really slow down how much we move when the mouse moves… change these values to change the speed. We don’t need the Z coordinate, so we split it out with a Separate XYZ and set the Z to 0 in a Vector node. Now when you move your mouse left or right, the bound node will also move left or right.
Now let’s show how you handle mouse clicks.

In this case, we simply respond to On Mouse events, listening for the release of the left mouse button, we simply reset the position of our object back to the origin. Just like dealing with keyboards, there are multiple states that can be tested for:
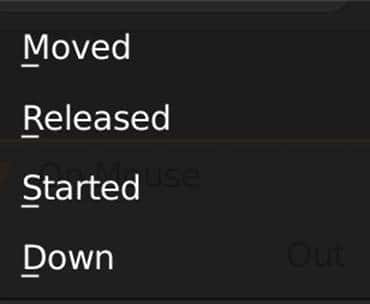
As well as options for left, middle, and right mouse buttons.
In some cases, you might want to have the same code fired by multiple different input events. For example, you might want to have code to move the player to the left if the user presses the left arrow, the A key, or presses left on the gamepad. Thankfully this is easily handled using custom events.
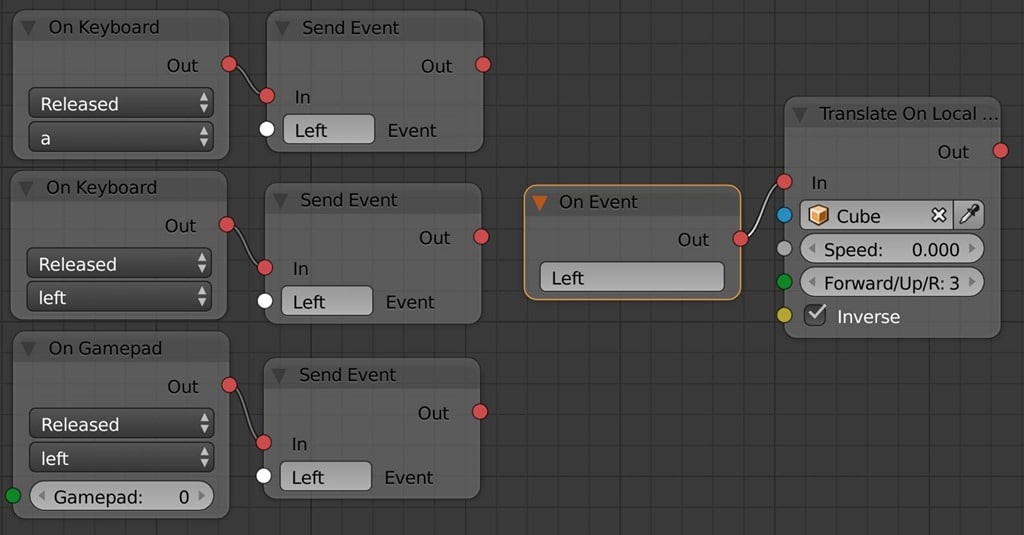
Here in the event of A, Left, or Left on the Gamepad we fire the Left event. Then we can use a single event handler to handle the Left event. Please be aware if you want the Event to be accessible in other graphs, you must use Send Global Event instead of Send Event.
Finally, its possible you want to poll for input. We actually did a bit of polling in the above examples, but let’s show a dedicated example.
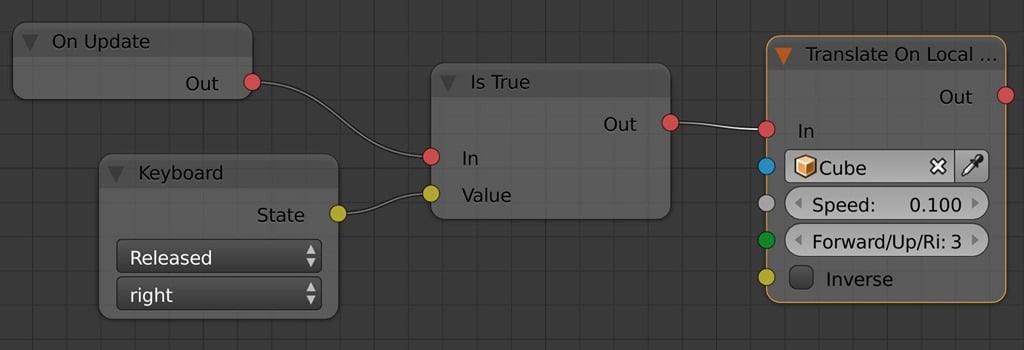
It’s much the same process, but instead of the process being started by a keyboard event, we instead implement an On Update node. If you are used to other game engines, On Update is basically your game loop, it’s a special node that is called every frame of your game and is generally where you will implement your game logic. In this case each frame we simply check the status of the keyboard, if the Right key was just released, we move to the right.
Whether you choose polled or event driven is entirely up to you. In this day and age, the performance difference really doesn’t matter, so it all comes down to which code style fits your game best.
Now let’s look at the same process using the Haxe language instead. In this case, add a new trait to your game. Enter the following code:
package arm;

class MyTrait extends iron.Trait {

  public function new() {
    super();

    // Create callback functions for when keys are pressed
    var onKeyDown : kha.input.KeyCode -> Void = function(key:kha.input.KeyCode){
      trace(key + " down");
    }
    var onKeyUp : kha.input.KeyCode -> Void = function(key:kha.input.KeyCode){
      trace(key + " up");
    }

    // Called when trait is intialized, only once, perform setup here
    notifyOnInit(function() {
      // Where up our event handlers
      kha.input.Keyboard.get().notify(onKeyDown,onKeyUp);
    });

    // Called every frame
    notifyOnUpdate(function(){
      //Poll for keyboard input
      if(iron.system.Input.getKeyboard().released("space"))
        trace("Spacebar pressed");

      //Now poll for left mouse clicked, if so, print out mouse current location
      if(iron.system.Input.getMouse().released("left"))
        trace("Left mouse button clicked at (" + iron.system.Input.getMouse().x +
          "," + iron.system.Input.getMouse().y + ")");
    });
  }


}
This example shows a number of things in a short code example. Armory currently doesn’t actually have events that are fired when Input occurs on the Haxe side, but the underlying Kha library does. In this event, we declare 2 functions, one that’s called when a key is first pressed and the other called when a key is released. We wire up these two event handlers by calling notify() on the keyboard, passing in our two functions.
This example also shows polling, this is done by implementing the notifyOnUpdate() callback, which is called every frame, over and over as long as your game is running. We can get the keyboard by calling iron.system.Input.getKeyboard() which has a series of functions to check different statuses. In this case, we check to see if it was released using the released() function, passing in the description of the key we want to check. These values will match the names we saw earlier when using nodes. We also show how to poll the mouse which we can get a reference to using iron.system.Input.getMouse(). You will notice that the iron library acts as our interface between our code and Blender/Armory. We will be using it A LOT in the future!
This code snippets wont work…
Unfortunately with Cocos Creator 2.0 upgrade, they refactored the way input is handled, breaking this code sample. There is a migration guide in the works, but it was massively delayed being translated to English. There is also a 2.1 version in the works that hopefully fixes the problems in 2.x.
At this point in time, I’d highly recommend using the 1.9x branch instead, then all of the code will work and you can avoid the massive influx of bugs that came with the 2.0 release.
Hi,after some “try and error” and looking in the code-description, this Code works for v2.1.first one:@ccclassexport default class NewClass extends cc.Component { public keys : Map<number, boolean> = new Map(); // LIFE-CYCLE CALLBACKS: onKeyDown(e:cc.Event.EventKeyboard){ this.keys.set(e.keyCode, true); console.log(“Key Down: ” + e.keyCode); switch(e.keyCode){ case cc.macro.KEY.right: if(this.keys.has(cc.macro.KEY.shift)) console.log(“Right and shift pressed”); else console.log(“Right pressed”); break; } console.log(this.keys.size); } onKeyUP(e:cc.Event.EventKeyboard){ this.keys.delete(e.keyCode); console.log(“Key up: ” + e.keyCode); } onLoad () { cc.systemEvent.on(cc.SystemEvent.EventType.KEY_DOWN, this.onKeyDown, this); cc.systemEvent.on(cc.SystemEvent.EventType.KEY_UP, this.onKeyUP, this); } start () { }and the second snipp works fine. Do not know what problem you’re having with it.