Introduction to Sound & Music
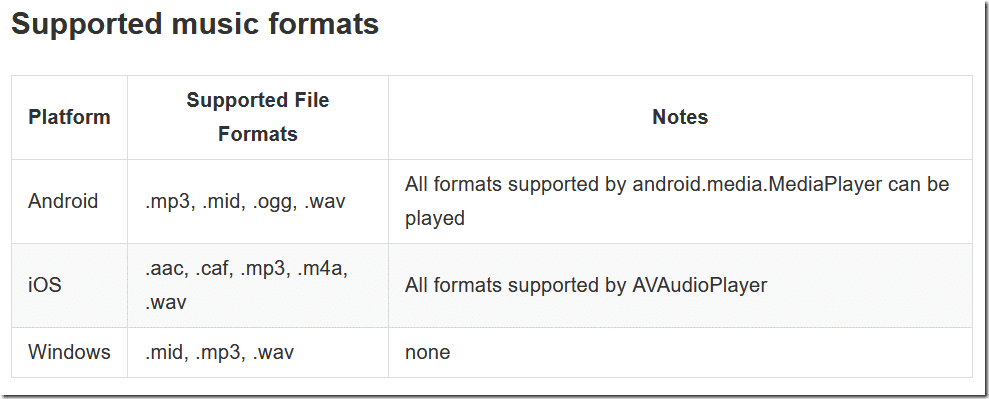
In this tutorial, we break down how to play audio files, both sound effects and longer music files in Cocos Creator. The audio files supported depend heavily on the platform you are running on. Here is the list of supported music formats (audio formats is a subset of this list):
Scanning the list makes your choices pretty obvious, WAV and MP3 are the only formats universally supported. WAV is better for short sounds such as sound effects. MP3 files are compressed, making them ideal for longer audio files like dialog or background music, but more processor-intensive, since they need to be decompressed to be played. THAT ALL SAID, WAV CURRENTLY DOESN’T WORK IN THE SIMULATOR, AT LEAST ON WINDOWS!!! Stick to OGG and MP3 for all sound files for now!
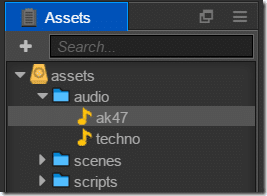
Adding audio files to your scene is just the same as all other assets so far. Create a folder for them, and drag and drop the resources in. You can see I’ve imported an mp3 and wav file:
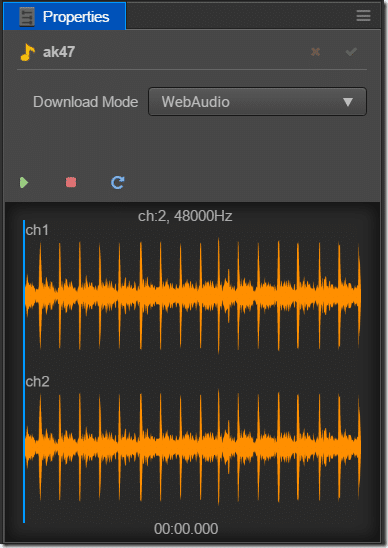
You can listen to your imported audio files by selecting them in the Assets folder. This opens a player in the Properties panel like so:
You can specify how the audio files should be played, either using WebAudio or DOM. Selecting Web Audio has good compatibility across devices/browsers but consumes more memory. DOM audio uses less memory but can have limitations, such as only being able to play one instance of a sound at a time.
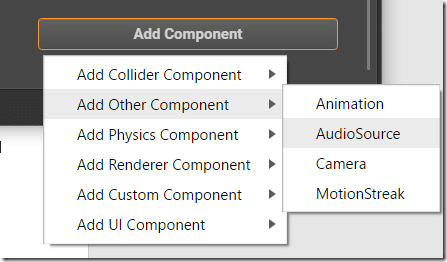
Now that we have sound files, let’s use them. Attach a component to an object in your game. Select Add Other Component->AudioSource.
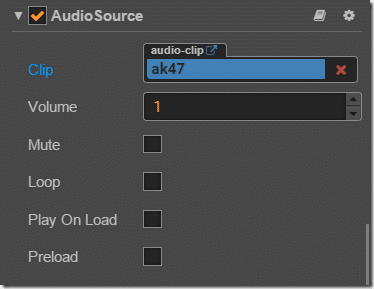
Now simply drag your audio file into the Clip section of the AudioSource component:
If you want the sound effect to loop, play automatically when loaded, be muted, etc… check the corresponding box. Now let’s look at the way we play this component using a script. I simply connect a new script to our object containing the AudioSource component.
const {ccclass, property} = cc._decorator;

@ccclass
export default class AudioPlayer extends cc.Component {
    onLoad () {
        cc.systemEvent.on(cc.SystemEvent.EventType.KEY_DOWN,(e)=>{
            if(e.keyCode == cc.KEY.space){
                var audio = this.node.getComponent(cc.AudioSource);
                if(audio != undefined){
                    if(this.node.getComponent(cc.AudioSource).isPlaying == false){
                        console.log("Playingsound");
                        audio.play();
                    }
                    else{
                        console.log("Sound already playing");
                    }
                }
                else
                    console.log("Undefined audio");
            }
        },this);
    }
}
WARNING – AUDIO SUPPORT IN THE SIMULATOR IS SEEMINGLY LIMITED TO MP3s
In addition to using the AudioSource component, you can also play audio using the built-in cc.audioEngine singleton. Let’s start off by giving our node the ability to define an AudioClip If you are using TypeScript like I am, you can define a property using the following code:
    @property(cc.AudioClip)
    music: cc.AudioClip = null;
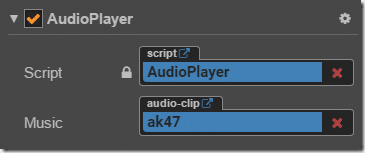
Now you will see there is a new option available in the script, enabling you to drag and drop in an audio file:
You can now play that audio using the code:
cc.audioEngine.play(this.music,false,1);
This function also returns an id of the currently playing audio instance. Using this ID you can then manipulate the sound while it’s playing. Here is the complete source code, the following code raises and lowers the volume on the currently playing sound when the up and down arrows are pressed, use the :
const {ccclass, property} = cc._decorator;

@ccclass
export default class AudioPlayer extends cc.Component {
    @property(cc.AudioClip)
    music: cc.AudioClip = null;

    lastAudioID: number = -1;

    onLoad () {
        cc.systemEvent.on(cc.SystemEvent.EventType.KEY_DOWN,(e)=>{
            if(e.keyCode == cc.KEY.up){
                if(this.lastAudioID != -1)
                    if(cc.audioEngine.getVolume(this.lastAudioID)< 1)
                        cc.audioEngine.setVolume(this.lastAudioID,cc.audioEngine.getVolume(this.lastAudioID) + 0.1);
            }
            if(e.keyCode == cc.KEY.down){
                if(this.lastAudioID != -1)
                    if(cc.audioEngine.getVolume(this.lastAudioID)> 0)
                        cc.audioEngine.setVolume(this.lastAudioID,cc.audioEngine.getVolume(this.lastAudioID) - 0.1);
            }

            if(e.keyCode == cc.KEY.space){
                var audio = this.node.getComponent(cc.AudioSource);
                if(audio != undefined){
                    if(this.node.getComponent(cc.AudioSource).isPlaying == false){
                        console.log("Playingsound");
                        audio.play();
                    }
                    else{
                        console.log("Sound already playing");
                    }
                }
                else
                    console.log("Undefined audio");
            }
            if(e.keyCode == cc.KEY.shift){
                // Ignore the error warning, the .d.ts definitions for play aren't accurate
                this.lastAudioID = cc.audioEngine.play(this.music,false,1);
                // Register a function that will be called when this audio file is done playing
                cc.audioEngine.setFinishCallback(this.lastAudioID,()=>{
                    this.lastAudioID = -1;
                });
            }
        },this);
    }
    update(dt){
        if(this.lastAudioID != -1){
            console.log(cc.audioEngine.getCurrentTime(this.lastAudioID));
        }

    }
}
Notice in the check for the SHIFT key being pressed we implement a callback using setFinishCallback(). This function is used to reset the lastAudioID to -1.

